Todas Atividades
Atualizada automaticamente
- Hoje
-
boa tarde.. tenho um relatorio que vem de um banco de dados mysql. ate ae tudo beleza. recebo os dados correto.. fiz um arquivo relatorio.php pra receber esses dados formatando com html e fiz um print.php pra imprimir em pdf o problema que no relatorio.php ta perfeito mas a hora que gera o pdf vem tudo desconfigurado.. essa tela e do relatorio.php essa outra e do pdf gerado na saida. segue o codigo fonte pra análise RELATORIO.PHP <html> <html lang="pt-br"> <head> <meta charset="UTF-8"> <meta http-equiv="X-UA-Compatible" content="IE=edge"> <meta name="viewport" content="width=device-width, initial-scale=1.0"> <title>Relatório de Entradas e Saídas</title> <style> @page{ margin: 150px 50px ; } body{ font-family: 'Verdana', sans-serif; margin:0px; padding:0px; } .header{ position: fixed; left: 0; right:0; top: -100px; height: 50px; padding: 10px; background: #333; margin-bottom:100px; text-align: center; } .header img{ height: 50px; } .footer{ position: fixed; left: 0; right:0; bottom:0; background: #333; color:#FFF; text-align: center; padding: 10px; } h1{ text-align: center; } table{ width: 100%; border:1px solid #333; padding: 5px; } table tr th{ background: #333; color:#FFF; padding:5px; } table tr:nth-child(even) td{ background: #EEE; } .image{ text-align: center; } .image img{ border: 1px solid #CCC; padding:3px; margin:5px; } </style> </head> <body> <header class="header"> <img src="https://www.botecodigital.dev.br/wp-content/themes/boteco_v4/img/logob.png" alt="" height="50"> </header> <h1>Relatório de Entradas e Saídas</h1> <form action="print.php" method="post"> <button type="submit" name="acao" value="gera_pdf">GERAR PDF</button> </form> <form action="r_entrada.php" method="post"> <button type="submit" name="acao" value="gera_pdf">VOLTAR</button> </form> <?php include('conectprint.php'); $sql = "SELECT * FROM tb_entrada"; $res = $conn->query($sql); if($res->num_rows > 0){ $html = "<table border='0'>"; while($row = $res->fetch_object()){ $html .= "<tr>"; // <th>Foto</th> $html .= "<th>Id</th>"; $html .= "<th>Matrícula</th>"; $html .= "<th>Nome</th>"; $html .= "<th>Tipo</th>"; $html .= "<th>Placa</th>"; $html .= "<th>Veículo</th>"; $html .= "<th>Cidade</th>"; $html .= "<th>Uf</th>"; $html .= "<th>Empresa</th>"; $html .= "<th>Data</th>"; $html .= "<th>Entrada</th>"; $html .= "<th>Saída</th>"; $html .= "</tr>"; $html .= "<tr>"; $html .= "<td>$row->id</b></td>"; $html .= "<td>$row->matricula</b></td>"; $html .= "<td>$row->nome</b></td>"; $html .= "<td>$row->tipo</b></td>"; $html .= "<td>$row->placa</b></td>"; $html .= "<td>$row->veiculo</b></td>"; $html .= "<td>$row->cidade</b></td>"; $html .= "<td>$row->uf</b></td>"; $html .= "<td>$row->empresa</b></td>"; $html .= "<td>$row->dataentrada</b></td>"; $html .= "<td>$row->horaentrada</b></td>"; $html .= "<td>$row->horasaida</td>"; $html .= "</tr>"; } $html .= "</table>"; }else{ $html .= 'Nenhum dado recebido'; } // print $html; echo $html; ?> <footer class="footer"> Gerado em <?php echo (new DateTime())->format('d/m/Y h:i:s')?> </footer> </body> </html> Print.php <?php // chamando os arquivos necessários do DOMPdf require __DIR__ . '/vendor/autoload.php'; // Ajuste o caminho se necessário use Dompdf\Dompdf; require_once 'relatorio.php'; // inicializando o objeto Dompdf $dompdf = new Dompdf(); // coloque nessa variável o código HTML que você quer que seja inserido no PDF // carregamos o código HTML no nosso arquivo PDF $dompdf->loadHtml($html); // (Opcional) Defina o tamanho (A4, A3, A2, etc) e a oritenação do papel, que pode ser 'portrait' (em pé) ou 'landscape' (deitado) $dompdf->setPaper('A4', 'landscape'); // Renderizar o documento $dompdf->render(); // pega o código fonte do novo arquivo PDF gerado $output = $dompdf->output(); // defina aqui o nome do arquivo que você quer que seja salvo file_put_contents("./tmp/relatorio.pdf", $output); // redirecionamos o usuário para o download do arquivo die("<script>location.href='./tmp/relatorio.pdf';</script>"); ?> conectprint.php <?php $servidor = "localhost"; $usuario = "root"; $senha = ""; $dbname = "polo"; //Criar a conexao $conn = mysqli_connect($servidor, $usuario, $senha, $dbname); if(!$conn){ die("Falha na conexao: " . mysqli_connect_error()); }else{ //echo "Conexao realizada com sucesso"; } ?>


-
 BihariJi Online se registrou na comunidade
 -
 jameswilson07 se registrou na comunidade
 -
 Airlines Headoffice se registrou na comunidade
 -
 espoir voyance se registrou na comunidade
 -
 Harry Liu se registrou na comunidade
 -
 Maxtin Weber se registrou na comunidade
 -
 Infi Window se registrou na comunidade
 -

ChatGPT in Nederland: De Toekomst van Kunstmatige Intelligentie
uma questão postou Eudora Eudora PHP
Wat is ChatGPT? ChatGPT is een geavanceerd taalmodel ontwikkeld door OpenAI. Het maakt gebruik van kunstmatige intelligentie (AI) om gesprekken te voeren, vragen te beantwoorden en teksten te genereren. ChatGPT wordt wereldwijd steeds populairder vanwege zijn veelzijdigheid en gebruiksgemak. In chatgpt netherlands hebben Nederlandstalige gebruikers toegang tot een krachtige AI-tool die hen kan helpen met uiteenlopende taken. Waarom ChatGPT Gebruiken in Nederland? Het gebruik van chatgpt netherlands biedt verschillende voordelen voor Nederlandstalige gebruikers. Enkele van de belangrijkste redenen om ChatGPT te gebruiken zijn: Toegankelijkheid: Het is eenvoudig om toegang te krijgen tot ChatGPT, of je nu een beginnende gebruiker bent of een expert op het gebied van AI. Taalondersteuning: ChatGPT in het Nederlands maakt het mogelijk om in je eigen taal te communiceren, wat de gebruikerservaring aanzienlijk verbetert. Flexibiliteit: ChatGPT kan voor een breed scala aan taken worden gebruikt, van schrijven tot leren en brainstormen. Gratis toegang: In veel gevallen kun je chatgpt netherlands gratis gebruiken, wat het ideaal maakt voor iedereen die kunstmatige intelligentie wil ontdekken zonder verplichtingen. Toepassingen van ChatGPT Netherlands Met chatgpt netherlands kun je de volgende taken eenvoudig en snel uitvoeren: Schrijven en genereren van teksten: ChatGPT kan helpen bij het schrijven van blogs, artikelen, e-mails en andere soorten teksten. Creatief denken: ChatGPT biedt inspiratie voor nieuwe ideeën, projecten en verhalen. Ondersteuning bij studie: ChatGPT kan moeilijke concepten uitleggen, samenvattingen maken en meer. Probleemoplossing: Of je nu een vraag hebt over technologie, wetenschap of dagelijks leven, ChatGPT biedt direct antwoorden. Beperkingen van ChatGPT Netherlands Hoewel chatgpt netherlands een krachtige tool is, zijn er enkele beperkingen die je moet overwegen: Beperkingen in gebruik: Gratis gebruikers kunnen te maken krijgen met limieten op het aantal berichten per dag. Minder geavanceerde functies: Premium functies, zoals langere gesprekken of diepgaandere analyses, zijn alleen beschikbaar voor betalende gebruikers. Soms langzamere reacties: Bij piekuren kan de snelheid van de AI-antwoord vertraagd zijn. Tips voor Optimaal Gebruik van ChatGPT Netherlands Om het meeste uit chatgpt netherlands te halen, kun je de volgende tips gebruiken: Wees specifiek in je vragen: Duidelijke en gerichte vragen zorgen voor betere en meer relevante antwoorden. Experimenteer met verschillende opdrachten: ChatGPT kan voor een breed scala aan taken worden gebruikt, dus wees niet bang om verschillende soorten verzoeken in te dienen. Houd opdrachten kort en duidelijk: Kortere en gerichtere opdrachten leiden vaak tot snellere en effectievere resultaten. De Toekomst van ChatGPT Netherlands De ontwikkeling van kunstmatige intelligentie gaat snel, en ChatGPT is daarop geen uitzondering. Naarmate de technologie zich verder ontwikkelt, zullen de mogelijkheden van chatgpt netherlands verder uitbreiden. Dit betekent betere prestaties, meer gepersonaliseerde interacties en geavanceerdere functionaliteiten. AI zal een steeds belangrijkere rol spelen in ons dagelijks leven en werk, en chatgpt netherlands zal daarbij een belangrijke bijdrage leveren. Conclusie Chatgpt netherlands biedt een gemakkelijke en toegankelijke manier om de kracht van kunstmatige intelligentie te verkennen. Of je nu een student bent die hulp nodig heeft bij het leren, een schrijver die inspiratie zoekt, of gewoon nieuwsgierig bent naar de mogelijkheden van AI, ChatGPT biedt een breed scala aan toepassingen. Begin vandaag nog met het ontdekken van ChatGPT en zie hoe het jouw dagelijks leven kan verbeteren. -

Teclado Matricial picsim e Mplab
pergunta respondeu ao Pedro Lucas Moreira da Silva de Holly Max em Tutoriais & Dicas - C, C++
I get it. Configurando teclado matricial no PICsim...ugh. I've been there. It's like trying to get a hyperactive toddler to focus. The whole "*" thing to mask the password... yeah, that sounds deceptively simple but it's a total headache to implement smoothly, right? It's almost as frustrating as accidentally tapping the wrong flappy bird pipe for the millionth time. Maybe try breaking it down into smaller, very manageable chunks? Focus on just reading the keypad first, then worry about the masking. Good luck, you've got this! I think... maybe. -
The way you described the learning process as a series of attempts and gradual improvement is so true. It reminds me of playing Doodle Baseball – sometimes you swing and miss completely, but each time you learn a little about timing and trajectory. It's frustrating at first, but so satisfying when you finally connect and hit a home run! Thanks for putting this into words.
-
If you’ve been working with Active Server Pages (ASP) for any amount of time, you’ve probably encountered the usual challenges — dealing with complex database queries, troubleshooting server-side errors, or finding a way to optimize performance. As a developer, these issues can eat up a lot of time and energy. That’s where AI can come to the rescue. I’ve recently started experimenting with Grok Ai (Grok.Free) to help streamline some of my ASP development processes, and let me tell you — it’s been a game changer. Instead of spending hours manually debugging code or searching through forum threads, I’ve been using Grok Ai to assist with common issues, and it’s really sped up my workflow. For example, last week, I was working on an ASP page that interacted with a MySQL database. The page was throwing an error that I couldn’t pin down. Normally, I would have gone through the code line by line, trying different fixes. But this time, I tried describing the issue to Grok Ai: “I’m getting a database connection error in my ASP script.” Within seconds, Grok Ai suggested a few things I hadn’t thought of. It pointed out that my database connection string might have been outdated, and suggested specific changes to make sure it was using the correct port and credentials. It also offered advice on handling database connection pooling more efficiently, which I had been neglecting. The best part about using Grok Ai is that it’s not just giving me the answer — it’s helping me understand why certain fixes work. For example, it explained why connection pooling can help with performance in larger applications, which was something I had read about but hadn’t fully implemented. Now, AI like Grok Ai isn’t going to replace your need to know how to write code. It won’t magically solve every problem. But it sure does make the development process smoother by pointing out potential issues quickly, suggesting better practices, and even helping me avoid common mistakes. Whether it’s helping with database integration, security vulnerabilities, or performance optimization in ASP, Grok Ai is proving to be a valuable tool for me. It’s like having a second set of eyes that never gets tired, always suggesting ways to improve and troubleshoot your code. So, if you’re an ASP developer looking to save time and streamline your workflow, definitely give Grok Ai a try. It’s not a silver bullet, but it sure makes the whole process a lot less frustrating.
- Yesterday
-

Arquivo PHP, HTML não esta Rodando Arquivo CSS
pergunta respondeu ao Samuel Carlos Ribeiro de Marcelo_2 em Repositório de Scripts - PHP
Olá. Ta funcionando sim. você tem certeza que instalou o servidor (Apache ou Xampp)?
-
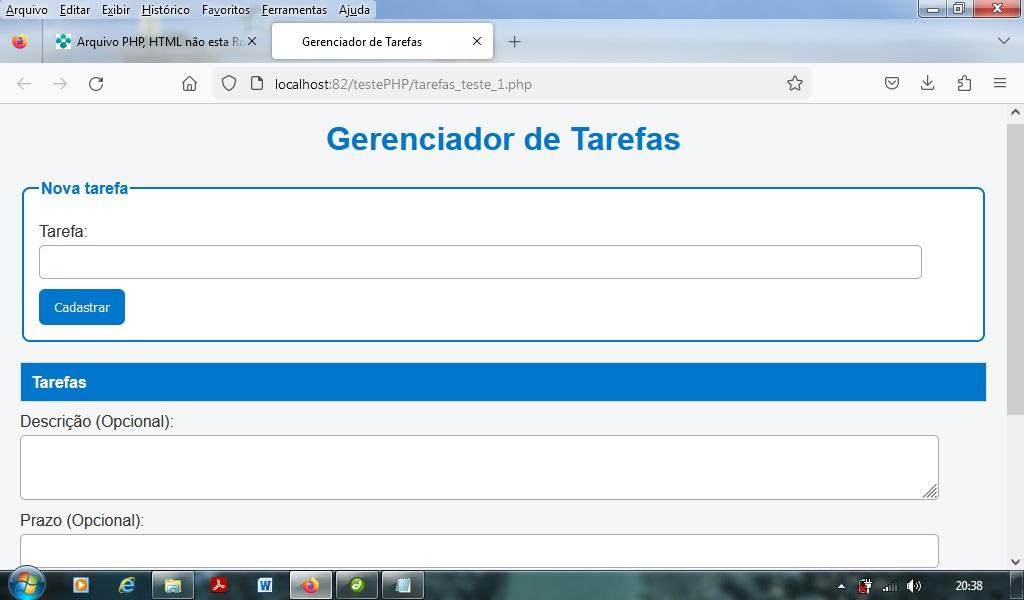
 Boa noite Estou fazendo um estudo em PHP, HTML, CSS e MySql, mas quando executo o script no navegado não esta aplicando o arquivo CSS, sou amador nessas linguagem, espero que tenham paciência. Segue os Códigos: .PHP <?php session_start(); if (isset($_GET['nome'])) { $_SESSION['lista_tarefas'][] = $_GET['nome']; } if (isset($_SESSION['lista_tarefas'])) { $lista_tarefas = $_SESSION['lista_tarefas']; } else { $lista_tarefas = array(); } include "template.php"; ?> .HTML <html> <head> <meta charset="utf-8" /> <title>Gerenciador de Tarefas</title> <link rel="stylesheet" href="tarefas.css" type="text/css" /> </head> <body> <h1>Gerenciador de Tarefas</h1> <form> <fieldset> <legend>Nova tarefa</legend> <label> Tarefa: <input type="text" name="nome" /> </label> <input type="submit" value="Cadastrar" /> </fieldset> </form> <table> <tr> <th>Tarefas</th> </tr> <?php foreach ($lista_tarefas as $tarefa) : ?> <tr> <td><?php echo $tarefa; ?> </td> </tr> <?php endforeach; ?> </table> <label> Descrição (Opcional): <textarea name="descricao"></textarea> </label> <label> Prazo (Opcional): <input type="text" name="prazo" /> </label> <fieldset> <legend>Prioridade:</legend> <label> <input type="radio" name="prioridade" value="baixa" checked /> Baixa <input type="radio" name="prioridade" value="media" /> Média <input type="radio" name="prioridade" value="alta" /> Alta </label> </fieldset> <label> Tarefa concluída: <input type="checkbox" name="concluida" value="sim" /> </label> <input type="submit" value="Cadastrar" /> </body> </html> .CSS /* tarefas.css */ /* Estilo geral da página */ body { font-family: Arial, sans-serif; background-color: #f4f6f8; margin: 20px; color: #333; } /* Título */ h1 { text-align: center; color: #0077cc; } /* Formulário */ form { margin-bottom: 20px; } fieldset { border: 2px solid #0077cc; border-radius: 8px; padding: 15px; margin-bottom: 15px; background-color: #fff; } legend { font-weight: bold; color: #0077cc; } label { display: block; margin: 10px 0; } /* Campos de entrada */ input[type="text"], textarea { width: 95%; padding: 8px; margin-top: 5px; border: 1px solid #aaa; border-radius: 5px; } /* Botões */ input[type="submit"] { background-color: #0077cc; color: white; border: none; padding: 10px 15px; border-radius: 6px; cursor: pointer; } input[type="submit"]:hover { background-color: #005fa3; } /* Tabela de tarefas */ table { width: 100%; border-collapse: collapse; background: #fff; } th, td { border: 1px solid #ddd; padding: 10px; text-align: left; } th { background-color: #0077cc; color: white; } tr:nth-child(even) { background-color: #f9f9f9; }
 -
 Kana Tal alterou sua foto pessoal
 - Última semana
-
 Boa tarde. Estou com o erro Client-Library libpq.dll found but could not be loaded. Check compile-target and library compatibility ao tentar conectar num banco postgreesql utilizando uma aplicação em delphi com Zeos. Já coloquei a DLL na pasta do executável, no system32 e syswow, já instalei o pgadmin e o client do postgreesql e não funciona Na minha máquina de desenvolvimento funciona normalmente, somente ao rodar no cliente não funciona. testando a conexão do banco pelo pgadmin funciona corretamente Alguém já passou por esse problema e poderia me ajudar?
 -
Essa é a ideia do polo 3 que mandei para você. Espero que você goste dele.
-
bom na saida ele fala o numero da matricula dele ou proprio nome na listagem das entradas e so liberar.. acho q vou recomeçar do zero recriar tudo certinho tirando esse monte de coisas e deixa o basico funcional e depois a gente pensa em design.. tirar esse monte de conexao louca kkkkkkk tb quando tava aprendendo eu juntava os codigo e ate que funcionava bem. mas hoje pra mexer ta dificil to preferindo recriar.. não sei muita coisa mas vou fuçando e com a ajuda de vocês pode ate funcionar pra tdos.. não quero uma coisa que fique presa a somente uma pessoa e sim a todos que querem um sisteminha..
-
 https://github.com/frankhosaka/polo3 Graças a Deus, eu consegui!
 -
Eu não vejo como a matrícula aleatória pode ajudar a identificar o visitante. Eu ainda acredito que o nome que o visitante fornece é o melhor ponto de partida. Caso você insista em usar a matrícula aleatória, como você vai saber o número da matrícula do visitante que pretende sair?
-
consegui ate que em fim fazer o codigo aleatorio e salvar no banco de dados. agora tenho q juntar ele ao sistema de cadastro do cliente pra gerar o codigo na hora do cadastro e já salvar matricula com os dados do cliente.. segue o codigo. <?php $servername = "localhost"; $username = "root"; $password = ""; $dbname = "polo"; // Criar conexão $conn = new mysqli($servername, $username, $password, $dbname); // Checar conexão if ($conn->connect_error) { die("Conexão falhou: " . $conn->connect_error); } echo "Conexão bem-sucedida"; // Gerar o código aleatório de 6 dígitos $codigo_aleatorio = rand(100000, 999999); echo "<br>Código gerado: " . $codigo_aleatorio; // Inserir o código no banco de dados $sql = "INSERT INTO tb_entrada (matricula) VALUES ($codigo_aleatorio)"; if ($conn->query($sql) === TRUE) { echo "<br>Código salvo com sucesso no banco de dados!"; } else { echo "<br>Erro ao salvar código: " . $conn->error; } // Fechar a conexão $conn->close(); ?>
-
Com a ajuda do Copilot eu consegui pegar um arquivo do diretório Downloads e colocar na raíz do diretório do projeto PHP, mas precisei usar várias tentativas; precisei editar o arquivo PHP.ini de tal forma que o PHP aceitasse a trabalhar com arquivo de 300 mb, acho que o arquivo original é de apenas 10 mb, e assim descobri porque só obtive frustração nas primeiras tentativas. Já o Livewire é muito mais obscuro, procurei o sistema de arquivo no manual do Laravel e eu não consegui entender absolutamente nada. O problema é que o manual está escrito em inglês e o código é bem diferente do que estava acostumado, geralmente rodeado por uma classe e métodos. Não tem nada disso, e nem sei como executar o código que eu encontrei. O manual não é nada didático. O meu problema é o arquivo zipado, eu pensei que era possível abrir o arquivo no meio do ar, mas o Copilot disse que eu preciso gravar primeiro no sistema de arquivo. O Copilot deu alguns exemplos, mas nada deu certo. É nessa hora que eu percebo que não sei absolutamente nada de linguagem de programação. O pior é que só estou fazendo o teste aqui no Notebook. Quando eu chegar no servidor, isso vai ser outro pesadelo. Estou apavorado.
-
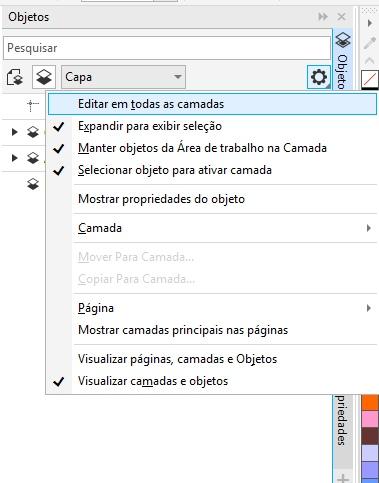
O tempo todo tenho que ativar e desativar essa função pois trabalho em diversas layers (camadas). Está opção está na cortina "Objetos", clicando na engrenagem. Já pesquisei na net e na documentação, infelizmente não existe atalho para ela. Se alguém com facilidade em programação puder ajudar, serei muito grato!
-
Para consultar uma nota fiscal eu usava o Windows e o OneDrive, isso é um serviço bem chato, mas consegui passar o serviço para o Livewire. Criei a tabela tblivroentrada e dentro dele guardei uma cópia do xml da nota fiscal. Para o Livewire procurar o CFOP e o NCM de um produto, ele usa essa função: <?php // listagem parcial function consultaLivro($lcto = null) { if($lcto) { $consulta=tblivroentrada::where('lcto',$lcto)->first(); if(!$consulta) { $this->mensagem = "Não há registro no livro para o lançamento $lcto"; } else { $xml=simplexml_load_string($consulta->xml); $namespaces=$xml->getNamespaces(true); $xml->registerXPathNamespace('n',$namespaces['']); $nome=$xml->xpath('//n:emit/n:xNome')[0]; $letra=strtolower(substr($nome,0,1)); $codigos=explode(" ",$this->codforn); foreach($codigos as $codigo) { if(strtolower($codigo[0]) === $letra) { $codXML = substr($codigo,1); break; } } $itens=$xml->xpath('//n:det'); foreach($itens as $item) { if($item->prod->cProd==$codXML) { $cfop=$item->prod->CFOP; $ncm=$item->prod->NCM; $prod=$item->prod->xProd; } } $this->mensagem = "Foi encontrado $this->codforn <br> Fornecedor $nome <br> Produto $prod <br> CFOP $cfop NCM $ncm"; } } else { $this->mensagem = null; } } e no blade tenho: @if($mensagem) <div class="fixed inset-0 flex items-center justify-center" style="background-color: rgba(0, 0, 0, 0.5)"> <div class="bg-white p-6 rounded shadow-lg"> <h2 class="text-lg font-semibold">Mensagem</h2> <p class="mt-2 text-gray-700 text-xl whitespace-nowrap">{!! $mensagem !!}</p> <button wire:click="consultaLivro" class="border rounded-lg px-2 py-2 ">Fechar</button> </div> </div> @endif
-
ACCESS NOVO
pergunta respondeu ao Elieudo Pereira de Frank K Hosaka em Tutoriais & Dicas - Visual Basic
Para usar o Visual Basic no Microsof Access eu marco as seguintes referências: Visual Basic for Applications Microsoft Access 16.0 Object Library Microsoft Office 16.0 Access database engine Object Library OLE Automation -
eu não conhecia o copilot é show de mais pois eu estou como como voce, não percebo quase nada de php Mas voltando ao meu caso, atualizei o php e já funcionou direito Troquei a ultima parte <?php foreach($teste->item as $i) : ?> <div class="flex even:bg-gray-200"> <div class="w-[200px]"><?=$i['item']?></div> <div class="w-[150px]"><?=date('d/m/y H:i',strtotime($i['data']))?></div> </div> <?php endforeach por isto <select id="id" name="nome" size="1"> <?php foreach($teste->item as $i) : ?> <option value="value"><?=$i['item']?></option> <?php endforeach; ?> </select>
-
eu tirei a função array_column no momento de definir a variável $ambiente e isso me obrigou a trabalhar com a chave 'ambiente' da variável lá na frente. É quase difícil de enxergar. Estou estudando PHP desde 2020, e até hoje eu apanho na hora de definir uma classe, método e argumento. Eu também não sei quase nada de HTML e menos ainda MySQL. Vou fazendo tudo com tentativa e erro, hoje eu conto com a ajuda do Copilot. Espero que você tenha mais sorte na hora de resolver os problemas, estou estudando desde 2020, e não consegui resolver nada ou sequer ganhar algum trocado.
-
Senhores, bom dia. Estou com dificuldade pra conectar no access (accdb). Já fui em references, marquei o Microsoft ActiveX Data Objects 2.8 Library, mas não consigo conectar no banco. Alguém tem um exemplo? Sem mais Elieudo
-
Interessante a discussão 👌. Eu também notei diferença de desempenho quando testei o Minecraft apk em máquinas com gráficos integrados, principalmente em servidores maiores. Talvez ajustar as configs gráficas ajude bastante. link https://minecraft.es.modfyp.com/
- Mais Cedo
-

É possível definir o $mysqli apenas uma vez?
pergunta respondeu ao Frank K Hosaka de Cleimar Lemes em PHP
beleza vou te enviar agora.. obrigado.. -
sim tenho a versao 5.6.36 mas o que muda no código?
-
É possível definir o $mysqli apenas uma vez?
pergunta respondeu ao Frank K Hosaka de Frank K Hosaka em PHP
Boa tarde, Cleimar, eu não tenho o projeto Portaria, mas se você mandar um arquivo zipado para [email protected], eu vou estudar e ver no que eu posso ajudar. -
Isso só é possível se a sua versão do php for anterior ao 5.5, e nós já estamos na versão 8.4. Ou você atualiza o PHP ou muda o código assim: <?php Class Teste { public $ambiente,$item,$selecionado; function selecionado($ambiente) { $this->selecionado=$ambiente; $mysqli=new mysqli("localhost","root","","teste"); $this->ambiente=$mysqli->query("select ambiente from tbcomodo order by ambiente")->fetch_all(MYSQLI_ASSOC); $id_comodo=$mysqli ->query("select id from tbcomodo where ambiente='$ambiente'") ->fetch_assoc()['id']; $this->item=$mysqli->query("select * from tbservico where id_comodo = $id_comodo group by item order by item")->fetch_all(MYSQLI_ASSOC); } } $teste=new Teste(); // $teste->criarTabela();exit; if(isset($_GET['rota'])) { $teste->selecionado($_GET['rota']); } else { $teste->selecionado("cozinha"); } ?> <script src="https://cdn.tailwindcss.com"></script> <body class="w-[500px] m-0 m-auto"> <h2>Selecione um cômodo</h2> <select onchange="location.replace('?rota='+this.value)"> <?php foreach($teste->ambiente as $a) : ?> <option <?=$a['ambiente']==$teste->selecionado ? 'selected' : ''?>> <?= $a['ambiente'] ?> </option> <?php endforeach; ?> </select> <h2 class="mt-5">Serviços executados</h2> <?php foreach($teste->item as $i) : ?> <div class="flex even:bg-gray-200"> <div class="w-[200px]"><?=$i['item']?></div> <div class="w-[150px]"><?=date('d/m/y H:i',strtotime($i['data']))?></div> </div> <?php endforeach; ?> </body>